How to Make an Appliqued-Monogrammed Patch
I LOVE the how versatile a patch can be. Whether it’s an appliqued patch with satin finished edges or a raggy patch with raggy edges. A patch can be ironed on (most common way when we think of a patch) or glued on with E6000 (my favorite way due to the ability to stay adhere way longer then Heat-n-Bond Lite). The glued patch allows you to monogram items that can not be hooped easily with your machine (lots of single needles limit one’s ability to hoop items), items that have pockets on the inside of a bag and can not be stitched shut, and a solid patch allows you to monogram an item that has a busy pattern whereas otherwise a monogram would get lost in the pattern….no matter what color thread choice one chooses on a busy pattern, the monogram always seems to get lost in the pattern.
Below I explain how I make my patches using simply one of my applique designs. I demonstrated it using an oval design, but this will work with any patch applique design.
Materials needed: hoop, 2 sheets of tear away stabilizer, 2 pieces of fabric, temporary adhesive spray, Fray Check, E6000, craft stick (not shown) and a few drops of water (optional)
The tear away stabilizer will act as your item (example: a shirt) being appliqued. So hoop your two pieces of tear away. I used two pieces to give the patch more stability/stiffness.
Since I know my patch is oval and will be stitched out in the center of my hoop,
I simply adhered my fabric to the stabilizer with the spray prior to stitching out my placement stitches of the applique.
Not only do I adhere the fabric inside of my hoop, but with my second piece of fabric I adhere it to the under side of my hoop.
By making a fabric backing of the patch, it will insure that the patch will adhere to the item with the e6000 glue. If I were to leave the back of the patch tear away stabilizer,
I would be putting glue on something that would eventually tear away……are you with me??? I hope that is not too confusing.
Some folks call this method floating…..I’m not hooping the fabric on top nor on the bottom. I am floating it on top and bottom of the stabilizer within the hoop.
Then place your hoop in the machine to stitch out the placement stitch as well as the tack-down stitch.
This is the underside or backside of the patch once it’s been stitched.
Trim the applique just as you would if you embroidered it on an item.
This is the top of the hoop.
This is back of the patch on the underside of the hoop. Trim it just as you would any applique.
Front….trimmed and ready for satin stitch.
Backside
Return the hoop to the machine for the satin stitch and monogram.
Once the design/patch has stitched out. Take it out of the hoop and tear away the stabilizer.
There will be or could be a few little remnants of the tear away left behind.
I put a little bit of water on the tip of my finger and gently rub the remnants away from the stitches.
My tear away stabilizer is not tear away solvable, but wetting it a little makes it go away.
I do the front side as well as the backside with a wet tip of my finger. I also make sure to trim any threads that may show.
I would like to believe the Fray Check will act as a protectant coat around my outer stitches.
I mentioned that I like to apply my patches with E6000 clear glue. It washes well as well as sticks well.
NOTE: It does take 24 hours to cure.
Some people like to put Heat-n-Bond Lite on the back of their patches. I personally don’t trust HnBL to last as well as the E6000.
Also HnBL requires heat from an iron and depending on the item, it may not allow ironing.
In the photos below, you will see that I put the E6000 on the backside of the patch and spread it out to the edges with a craft stick.
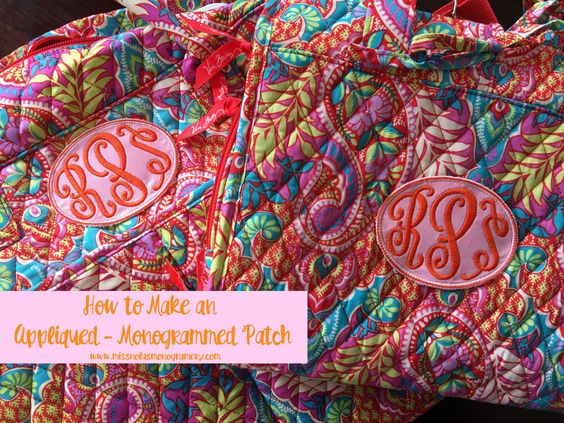
The patch is ready to be applied to the item. My item shown below is a Vera Bradley Hanging Organizer.
The patch works well with VB items for several reasons……
It allows a nice solid area so that the monogram pops on the busy pattern.
AND
It allows a monogram to go on an item that can not be stitched. The inside of the organizer is filled with zipped pockets.
I also had a VB Weekender and Ditty Bag in this pattern.
Neither of those allowed for stitching of a patch due to the nature of the insides of the bags.
When attaching the glued patches to the quilted items. I placed a clean chopping block inside of the Weekender
to put pressure against something hard.
The puffiness of the quilting made it harder to put the pressure that was needed on the patch.

I simply just opened up the Hanging Organizer to put pressure against my hard table.
It basically lays flat once opened fully.

The Ditty Bag lays flat and is not quilted so no issues when adding pressure.

Like I mentioned….a patch can be so versatile. It allows you to monogram those things that can not be monogrammed the traditional way.
This is also a great way to monogram all the VB backpacks and lunch boxes. (Not just VB items but patterned items)
It eliminates the needles puncturing the insulation of the lunchboxes….if that were ever an issue. Although I have torn insulation before with a monogram.
Contact me if you have any questions and ….
happy monogramming!!


hello this is THE BEST instructions for making a patched. i have made a couple and love them . however its been a while since I've made them using your instructions, please I hope you can add your photos back to your blog. I want to make more patches and would also love to share your instructions .
ReplyDelete